A Key To Success in the Martial Arts…

How to succeed in Martial Arts
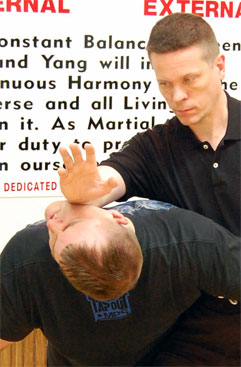
One key reason Sigung Clear has been so successful in studying the arts and developing the skill he has is…

He doesn’t care what it’s called.

He started training with one goal:

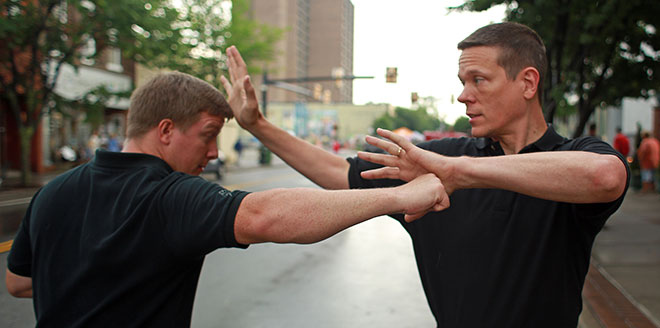
– Learn how to survive a vicious street attack.

Shortly after that he added a second goal:

– Learn how to be healthy, active and able at 90 years old.

Everything He’s studied over the years and everything we train and teach today is a means to achieve one or both of those goals.

It’s easy to get caught up in the name of a thing and lose sight of the goal.

Tai Chi wasn’t created to be Tai Chi.

It was designed as a tool, a means to an end. روليت اون لاين

If you lose sight of the purpose…

…well, a hammer is meant to drive nails.

If you start making hammers that are for painting and hanging on a wall, eventually you’ll end up making something that breaks when you strike a nail with it. لعبة جاك

Should you still call it a hammer?

So, we like to take our art off of its pedestal, throw it down the stairs and drag it through the mud.

It’s not the prettiest or the cleanest, but it does the job like nothing else. ماكينة القمار

If that sounds like your idea of fun come join us in the Internal Combat Arts Course:

http://www.clearsilat.com/internal-combat-arts

The Myth of Style VS Fighter (Kung Fu for the Slow and Unexceptional)

kung-fu-for-the-unexceptional
Stop me if you’ve heard this one.

“The fighter makes the style.”
“The fight in the fighter is more important than the style they practice.”
“Any style is good if you apply yourself.”

I’m not sure how this myth got started, but I can tell you why it sticks around.

Most martial artists don’t have reliable training methods.

The don’t use a carefully designed, step by step, curriculum that works for the vast majority of people the vast majority of the time.

  • Instead they have some forms
  • Some techniques
  • a few applications
  • some sparring

It’s all lumped together and the only folks who do well with it are exceptionally gifted or hardworking.

…but instead of examining the curriculum for problems they just blame it on their students.

Thing is, the “best” NASCAR driver can not win the Indy 500 in my ‘99 Ford Escort.

I recently saw it put this way,

“Material beats method”

Basically it doesn’t matter how hard you study or how good your teacher is. If you pick the wrong material you won’t get very far.

I don’t know about you but I’m not particularly gifted and I make procrastination an art. So I need a system that will work for the slow and unexceptional.

I need the most efficient and effective methods I can find.

Fortunately for me, Sigung Clear has been studying and researching self defense for over 40 years.

He’s constantly looking for the best and most effective training methods.

…So you don’t have to be gifted, or talented, or exceptional.

All you have to do is show up, do the work and keep at it.

The Clear Defense Method is the distillation of Sigung Clear’s 40 years of training.

We’ve taught it to all types, Old, Young, strong & feeble.

It can be learned quickly & effectively. And it works, even for the slow and unexceptional.

5 Steps to Learn Xing Yi in Less Than 1 Year & Be Able to Fight With It.

Xing Yi is the art of courage.

Xing Yi is the art of courage.

Xing Yi Quan is a powerful and effective art that can be learned fairly quickly if approached using these 5 steps.

In Kung Fu Skill comes from hard work over time.

Skill = Work x Time.

To increase skill you can squeeze more training time into each day…

…and you can increase the quality of your work by focusing on the most efficient and effective training methods.

For most people more time is hard to come by.

Fortunately, there is the 80/20 rule. This general rule of thumb states that 80% of the benefit comes from 20% of the effort.

In martial arts this ratio is often closer to 90/10 or greater.

The hard part is figuring out which 5 – 20% is going to give you all the skill you’re looking for.

Sigung Clear has been working on this for the last 35 years and he’s still studying and researching. Continuing to look for more efficient and effective ways to train.

Step 1: Purpose and Strategy

The first step is to define the purpose of the art.

Be detailed and specific. Martial Arts are different because they’re designed for different purposes.

Knowing what your art is trying to do is essential. Xing Yi’s purpose is to make someone a strong and powerful fighter quickly.

In Xing Yi strategy is to attack as soon as a threat presents itself.

“Xing Yi is the Art of Courage.”

It’s goal is to dominate the opponent’s center and overwhelm them. You do this by fortifying your own center and running over the opponent with a barrage of blasting strikes.

Once you understand what your art is trying to do then it becomes much much easier to keep your training focused on achieving that goal.

Sigung Clear in Beijing

Sigung Clear in Beijing

Step 2: Form VS Function

The next step in learning efficiently is to identify the signature techniques / movements of the art and learn their function.

When identifying the signature techniques of the art look for movements that are common to all lineages and variations of the art.

In Xing Yi this is the 5 Elemental Fists.

  • Pi Chuan
  • Tsuan Chuan
  • Beng Chuan
  • Pao Chuan
  • Heng Chuan

Now that you’ve identified the signature movements.

DON’T LEARN THE FORM.

Many people have spent years learning the forms of the 5 elements and combined forms and animal forms, etc… and they’re still no closer to being an effective Xing Yi Fighter.

Form was designed to achieve a function.

If you understand what a movement is supposed to do and how that helps the art achieve it’s overall purpose and strategy (covered in step 1) then refining and correcting your form will be easy.

…and you’ll be able to use what you are learning right away.

The function of the 5 elemental fists.

There are 3 basic things to know about the 5 fists.

1. Basic self defense application of each.
These are simple fighting methods that embody what each fist is about. These are taught in the introduction and prologue of the Xing Yi Intensive.

Sigung Clear in Beijing

Sigung Clear in Beijing

2. The physical action of each fist.

Keep this as simple as it sounds. It’s very easy to get sidetracked with very ornate versions of a move.

  • Pi Chuan is a downward falling or choping movement.
  • Tsuan Chuan is an upward twisting movement (think uppercut for now)
  • Beng Chuan is a forward driving movement.
  • Pao Chuan is an expanding upward and outward movement with a bit of rotation.
  • Heng Chuan is a crossing & closing movement.

By sticking to the simplest crudest version of a movement you will be able to fight with it very quickly, It will be very easy to understand what that move is about and how it helps you achieve your overall strategy.

…and as you gain skill it will be easy to add more complex variations of the movement to your skill-set.

These physical actions and how to use them are taught in Chapter 1 of the Xing Yi Intensive.

3. The Internal Action of Each Elemental Fist.

Because Xing Yi is an internal art, what’s happening inside your body is just as important as the physical movement.

Each of the 5 fists embodies a specific internal expression.

(keep in mind that all these expressions happen simultaneously to varying degrees.)

  • Pi Chuan is a heavy weighted drop. Your whole body should take on this heavy quality so that anywhere the opponent makes contact they should feel like they’ve been hit with a heavy sold sledge hammer.
  • Tsuan Chuan is drilling. This is a spiraling twisting action that connects the entire body from head to toe.
  • Beng Chuan is an expanding & contracting at the same time. It creates a crushing feeling through the whole body. Like pulling a very strong bow.
  • Pao Chaun is an internal condensing and release that expands and explodes outwards.
  • Heng Chuan is a simultaneous contraction & expansion that then releases. (similar in some ways to Beng but distinctly different as well.)

How to build and use these internal actions is taught in Chapter 2 of the Xing Yi Intensive.

Once you understand the function of the 5 elements and can use them then you’re ready for step 3.

Step 3: Critical Fighting Principles

Step 3 is to determine the most important characteristics / principles of your art.

Xing Yi is described as a cannonball skipping across the battlefield taking out anything in it’s path. It’s said to fortify the center. Xing Yi also dominates the opponent’s center and runs over and through them.

That’s 3 main things we need to do.

  1. Become the Steel Ball.
  2. Run over the Opponent while dominating their center.
  3. Explosive, sudden, powerful movement.

Let’s break down what skills make that happen.

Become the Steel Ball.

Structure, Heavy & Bone Shields are the 3 beginning ways to make this happen.

1. Structure – you need to build impeccable internal alignment from head to toe and be able to fight with it.

If someone makes contact with you it should feel like they ran into a telephone pole.

Be careful, if you train structure with too much stationary standing or solo work it will fall apart as soon as you need to use it.

The key to making this functional quickly is training it while moving with a partner who can provide resistance and check for errors. (you can get by with a heavy bag while you’re trying to find a training partner.)

Chapter 3 in the Xing Yi Intensive teaches you the drills and exercises you need to move and strike with impeccable structure.

2. Heavy / dropping root with every hit.

You’re already familiar with this as the primary internal action of Pi Chuan.

At this stage it’s important to build this quality so you can move quickly and explosively with it so that no matter what you’re doing or how you make contact with the opponent they feel you’re whole body weight behind every action.

How to maintain full body-weight while moving rapidly is covered in Chapter 4 of the Xing Yi Intensive.

3. Bone Shields – The opponent should always be getting hit by or be running into the hard parts of your body. The movements of the 5 fists are all designed to facilitate this. In Chapter 7 you’ll learn how to make sure this happens automatically.

These are the 3 beginning ways to become the steel ball.

Many of the other internal skills of Xing Yi will enhance this quality as well but we’ll address that later.

Run Over the Opponent While Dominating Their Center.

The first step is learning to find the opponents spine.

Every time you hit the opponent the impact should cut right through their body and affect the spine.

The drills that build this skill are taught in Chapter 3 of the Xing Yi Intensive.

Next is learning to use your fortified center to find and cut through the opponents center.

You’ll need to build the sensitivity to find the opponent’s center and learn how the action and shape of the 5 fists helps you get to the opponents center and dominate it.

Xing Yi does not meet force with force.

Even though you are driving right through the opponent’s center you are using subtle positioning skills to catch them at angles and directions that are bad for them. The drills in Chapter 5 teach you to do all this.

The last step is learning to close the distance

…and run over the opponent.

Most fighters close on the opponent until they get to the range they are comfortable in and then work from there.

Kickers try to keep a fight at kicking range, boxers try to work at boxing range, etc…

Xing Yi is a closing art.

It’s goal is to run through the opponent and come out the other side.

To do this you need to be able to get right next to the opponent without leaving yourself open & you must be able to strike with full power even though there is no space between you and them.

The skills we discussed earlier in Becoming the Steel Ball and Dominating the Center are the foundation.

Chapter 6 expands on those and teaches you how to keep yourself protected as you run over the opponent and how to maintain full power in every movement you make.

Sudden Explosive Power

You will already be developing power and explosiveness from the principles we’ve covered so far.

Once those have been developed use the following principles to add more suddenness and power to your movement.

Bamboo Art.

Every time you bend, rock or shift your body should feel like a piece of flexible Bamboo that will spring back into place.

Movement that would have broken your structure will instead stretch it loading more power into your frame to be released.

Chapter 15 teaches you how to use this expression of the art.

Spring Power

This principle uses the body like a spring. The secret to using this principle is that the retracting loading action of the spring has just as much martial application as the releasing expanding movements.

In order to be effective you’ll need to understand both aspects of this principle. This is taught in depth in Chapter 16.

Compression to Explode

This was introduced as the primary internal action of Pao Chuan.

You want to build this until you can use it all the time in all your movement.

The compression aspect adds power and increases the steel ball quality. The exploding aspect adds suddenness to your movement and increases power as well.

Compression & how to combine it with these other power sources is covered in Chapter 16.

Recap Steps 1 – 3.

At this point you’ve learned the fighting strategy, the signature fighting methods and the core principles of Xing Yi.

Your movement at this stage will be unrefined but you should be able to use the art effectively.

Step 4 Fighting Applications

Now it’s time to broaden your understanding of the 5 Fists.

The key here is that you DO NOT learn new movements. Instead learn new ways to use the movements you are already familiar with.

The primary things we recommend focusing on are:

  • The particularly evil applications of each element. (chapter 9)
  • Limb Destructions – how to take out the opponents limbs as you attack their center. (chapter 10)
  • Grappling – How to use the 5 Fists to break the opponents joints. (chapter 10)
  • Small Frame – Small compact uses of the 5 Fists. (chapter 10)
  • Animal Expressions – How animal expressions are derived from the 5 Fists. (chapter 11)

Step 5 Unusual Situations & Opponents.

Now it’s time to look at any situations or opponents that might give you trouble based on your current understanding of the art.

Find the holes in your understanding and learn how the art fills them in.

  • How to deal with an aggressive opponent who is good at staying just out of reach (chapter 12)
  • How to make your defense your offense against a close opponent (chapter 13)
  • How Xing Yi deals with Grapplers & Cagey moving opponents (chapter 14)
  • How to use the art in very confined spaces (chapter 17)

How long should this take?

That’s everything you need to become an effective Xing Yi practitioner.

With an art like Xing Yi this process should take about 1 year. You can certainly spend several more years honing these skills.

However, as long as you practice diligently, 1 year is all you need to be effective with the skills outlined above.

The Clear’s Xing Yi Intensive covers everything above in 8 months. It includes a whole bunch of training drills and games that will help you and a partner develop these skills at home.

Continuing Education

The next stage of training is to look at intermediate and advanced practitioners of the art and begin breaking down what training and skills will take you from proficient to master.

In Clear’s Xing Yi, once a student finished the Xing Yi Intensive, there are 8 training modules that help them take their art to an advanced level.

Wing Chun Lesson 3 – Create Openings to Strike

This is lesson 3 in our free online Wing Chun Training.

This game builds directly on the Hide a Hand game you learned in lesson 2. With one important variation.

Instead of trying to get a hand free, your goal is to touch the opponents left shoulder and keep your hand there as long as possible.

One person should play offensively while the other just focuses on defense. Both players will need to use the sticky and trapping skills from lesson 2.

This game is designed to teach the offensive player how to use their sticking and trapping skills to create openings where they can strike the opponent. While the defensive player gets better and sticking and trapping.

Bagua Lesson 8 – Defending Attacks from Behind You

[youtube https://www.youtube.com/watch?v=f4JLwysiNpY&w=560&h=315]

This is lesson 8 in our free online Bagua training.

Transcript: In Bagua, when you’re in single palm position, if the person is attacking around behind you or there position is slightly behind you. The number one thing to do about this is to step. ivermectine avis I’m staying positioned so I can turn quickly and so that I have the ability to move out of there at speed.

As soon as I see them I’m off to the races. I’m walking as soon as he’s all framed up at all or looking like he’s bringing something.

If your going to turn to them, the way you’re going to turn to them is to raise the top hand up as if you’re raising a window and looking underneath it. stromectol vente libre canada And when you do that you step and then turn back and so literally it becomes he’s pushing down on my arm and he could overcome it while I’m stationary, but now I’m moving and it’s got that same slicing action that made it so I don’t receive the force but he feels like he’s really doing something.

If he hits it it hurts him even though I’m getting out of the way.

From here if I step, which gives me my position through me and I can turn, and I barely need to touch him because it’s a bad position for him and a good position for me.

If he brought a punch from behind your head and one from in front you’re still in that position and keep turning as well off of that position. ivermectina 6 mg guayaki So I went here and turned as he came with that. And you’re going use it to break his arm or let him go and hit him in the back of the head or to do other things.

Don’t sweat that one right now, I just want to show you that if he had come in behind you it’s either walking or turning into him.

Normally you’d think you’re in a bad position because they are behind you, but if I’m gonna run away, where is he going to be? Behind me, if I’m running. Or even if I’m trying to walk away at some point he probably ends up behind me so it’s not such a bad thing you just have to understand what its strengths are and what its weaknesses are (most people see that right away) and how to use it, both aspects, all of it.

Bagua Lesson 7 – Single Palm Fighting Strategy & Presentation

[youtube https://www.youtube.com/watch?v=iGevOGd6E8E&w=560&h=315]

This is lesson 7 in our free online Bagua training.

Transcript: In Bagua, there are three simple ways that the single palm position can be used for the strategic aspect of fighting.

Fighting in the Single Palm Position

The first one is that I’ve got that palm up here and I’m facing him with that palm. I’ve got the back one as well and the leg and the ability to move and that kind of thing. موقع الفورمولا

Using a Welcoming Posture to set up the Single Palm

The second one is, in Bagua where you walk the circle doing the stationary postures, now some of them are very conducive for fighting stuff. Some of them are more to build your body and that kind of thing and normally most of them do both but there’s a couple or several specifically that are really useful for fighting and specially for multiple attacker situations.

One of the one’s is here, not this or other things, but there or hands out in front of you, kind of. There’s also this idea where you’re walking the circle and you’re doing this bit here and you’re using that, and in this case I’m facing him from here and as soon as he brings something or starts to I come out of there and I’m in single palm, now, like where I was before.

So, if he went around and came again, at some point here I’m striking him and notice I’ve opened back up. Even though I hit here he’s got sort of a strength here so I feel that and I’m coming off of that, from the single palm that I’m in here.

So the simple of this to see it from in front of you would be you’re doing like you’re doing that posture, walking the circle and you use it as you’re receiving. Now it’s not close to your body, when you do it in the form it’s not there either, it’s out in front of you like that. اليورو ٢٠٢١

Somebody in front of you might think it looks like that, that’s fine, but it’s here. As soon as they start to come and you figure out where you need to be going, then it becomes single palm. So that’s the second one.

Single Palm as an emergency technique

The third one is, for simple opening strategy. So the first two were, he’s a fighter and I’m right there, he’s a fighter and I’m right here. موقع رهان كرة القدم The third one is, I’m in whatever situation I’m in and he’s crazed, wants to hit somebody by surprise without them knowing it’s coming and I’m doing whatever I’m doing, and now I went to the position.

Notice that I got off the line, he’s gonna feel that hard hit there, it’s soft to me and I hit the weak spot on him all in the one move. Even if I wasn’t sure of the situation, then I realize there is a punch there and I’ll footwork it. It’s not this, It’s that whole body where the power is coming from.

And when he brings his other punch, same thing again.

Bagua Lesson 6 – Single Palm Position & Stance

This is lesson 6 in our free online Bagua training.

This lesson begins the Single Palm portion of our intro to Bagua. Single Palm is the signature fighting positon of Bagua. In this lesson we cover the basic posture and in the next several lessons we’ll show the fundamental of how to fight effectively from the Single Palm stance.

Transcript:
OK, so we’re going to do Bagua’s single palm position and stance so that you can work on that. So I’ll show it real quick here.

So I’ve got my knees together, I’ve got my butt underneath me, and my waist is turned. I’m off to my side, this is up here kind of like cross-pocket.

This shoulder is not sticking up like that, it’s more like I’m holding something heavy this way and that I came a little bit further with this while keeping that down. Turn the fingers up, put the other hand over there, kind of like ‘get away from me’ kind of a thing.

Single Palm Foot & Leg Position

So footwork first. Put you feet together bend your knees, and then bring you butt back forward a little bit and in. Then scoot that foot so that it wasn’t actually a step, it was a slide out to there.

Make sure that you’re sunk enough so that you can bend the knee like you’re stepping on the gas but that you’re back here and there’s no gap really between your legs. At the same time you could just as easily step behind you, set it down. That way you can also turn, and when you turn, put your legs together like this and notice that my knees are together and the foot could come here or here.

Turn the foot in, now I’m in the same position as i was in a second ago but facing the other direction.

the knees are protecting your groin area. You can pick up the front leg or the back leg if you want to. So you’re very mobile in the position even though to look at it in the beginning or you’re doing it wrong, it seem like it’s not. So the foot is here, pull it out of there completely, pull it up, put it back. The other one, up, back, behind you. Shift it, there they are together. That’s your footwork for simple, simple right now. That’s the footwork for the stance.

Hand and Arm Position

Then from here it’s, put your hand here like it’s holding something. Don’t let that shoulder move even though you’re gonna move that arm all the way across you. Turn that palm over but don’t lift the shoulder, keep it like that. Turn you fingers to the ceiling so that this is pushing down and around and up like that.

Now, don’t have it sharply bent and cut off here as much as it’s sort of angling it’s way up and it should point at the elbow on the other arm and then that hand faces straight out. There are different styles, hand positions and things that people do.

Simple, simple is I want that palm to come off there with no problem. the other arm is helping to cover my whole ribcage, covering those organs as well as your elbow is helping to cover some of that. It’s supporting to some degree that other hand.

Stay sunk for quick stepping

If your butt is sticking out before you step forward, you’re going to have to pull it in and then step. If your but is in, you’re literally rocking the feet and step. Same thing for going backwards. If your but is out, you will feel it in the shift. If it’s down and under you, it’s as fast as you can think to move your foot.

Internal Iron Body (Kuntao Silat)

Kuntao Silat Iron Body Training

Kuntao Silat Iron Body Training

This Iron Body training set is used to kickstart the internal iron development of all Clear’s Silat students.

Iron Body Training FAQ

Q. How much practice time do I need?
A. We recommend at least 20 – 30 minutes per day. (It will take some time to build up to 20 minutes per day. Eventually you could do up to 1 hour if desired.)

Q. How long will it take to develop my Iron Body.
A. That depends on how hard and consistently you train and how much previous development and experience you have. Clear’s Silat students usually begin to see noticeable development in 1 – 2 months.

Q. Are there any special diet, qigong or abstinence required with this practice?
A. You will learn a Bone Marrow Washing method on this dvd that must be practice along with this Iron Body Method. For best results you will need to eat a healthy diet, get plenty of rest and keep your vices to a minimum.

Q. Does this method need equipment such as iron/bamboo/mung bean beaters or similar stuff?
A. The Kuntao Silat method is internal. There is no equipment needed.

Q. Does the method covers all the body?
A. Yes, it covers the whole body from head to toe.

What’s the difference between the Internal Iron in 100 Days DVD and the new Kuntao Silat Iron Body DVD?

Q. Which Internal Iron Body is better? Tai Chi or Kuntao Silat?

The Internal Iron Body in 100 Days DVD is a Tai Chi method (Xing Yi & Bagua use this as well.)
The Kuntao Silat Iron Body DVD is an internal Kuntao Method.

If you’re focused only on Tai Chi then stick with the Tai Chi one.

If you study our Kuntao Silat, Xing Yi or Bagua…
..you enjoy Iron Body training…
….or you want to increase the pace of your Internal Iron development then get the Kuntao Silat one as well.

Our Kuntao Silat students learn the Kuntao one first and train it for several years before they build on top of it with other methods including the Tai Chi one.

The Kuntao Silat method is faster and a little less common while the Tai Chi one is slower but more advance and more internal.

If you are over 45 years old you’ll want to transition to the Tai Chi method exclusively at some point. However you will accelerate your Iron development quite a bit if you build a base with the kuntao method for a year or so first.

Q. Can I combine the Tai Chi method (Internal Iron Body in 100 days) and the Kuntao Silat method?
A. Yes, you can combine both methods.

If you already have good development with the Tai Chi method and want to add something then learn the Kuntao method and do both at the same time. The primary mechanism at work in the Kuntao method is the spiral which is used in all the internal arts as well.

If you haven’t trained either method start with one train it long enough to fully understand the method and get some decent development and then add the other method to it.

Bagua Lesson 5 – Bagua Intercepting & Cutting

This is lesson 5 in our free online Bagua training.

Transcript:
Bagua has different methods for how it engages or doesn’t engage an opponent. So I’m going to give you some insight into that.

As they bring a punch right down the line, one method is to get out of the way and keep walking, get off the line and keep walking. If you have been looking at other Bagua at all, ever, anywhere where they’re using it some, ideally you’ve seen that a bit.

Softly get out of the way

So that one is what I will call a very soft, to the other person, you’re trying to get them to hit empty air and not even necessarily feel you at all where you’ve made that connection but the connection is light and not stationary, it doesn’t stay put.

Although you will see where they punch and you cut across and they come and you’ll cut across and they come and you’re interacting and being soft until you get into a place where you actually land something.

Let them run into some hard

There is also this idea, I want to get out from in front of it, but I actually want them to feel like they ran into something hard.

This is one of the trickiest things that I try to teach regularly to really convey to people. Because for you, on your side it should feel like I hit air or almost air. for them it should feel like they ran into the wall and this should happen at the same time.

Use the Wedge

How do you get that, how does that happen, how do I get it so that he runs into something hard and I felt soft?

One of the ways I’ve seen it taught, and this is from Dr. John Painter, was what he calls the wedge and with the wedge he’s doing it here and the person comes and he starts coming this way and then it rolls a bit and cuts in so that you’re really rolling across it but they’re hitting into something hard that they can’t navigate through so they’re hitting it hard while you’re sort of coming around them.

So you can start it like that for simplicity. Make sure that it’s not grrr and I roll while keeping in there and I roll it and stay on it so that he feels all that power and it knocks him out of the way and yet I’m getting very little off of that because of the way that I’m wedging into it.

Use the forearms

I’m going to step it up a notch and do it slightly more sophisticated but also something a little more powerful. So what we’re going to use is the whole back of the forearm which we call a bone shield. You’ll notice that if my arm is in front, this part is leading, whether I’m going back or forth, up or down.

It is a little bit rounded because I want all that bony edge right there to be what they’re getting.

It should be that you can tell it’s a hard hit but the back of your forearm is going, “I’m not really feeling a whole lot but it’s good. It’s a rake or a brush, not your wrist but your forearm, back and forth, up and down.

It’s like they’re running into the wall but I’m hanging out here.

Baguazhang Lesson 4 – The Opponent Only Hits Air

This is lesson 4 in our free online Bagua training.

Transcript:
So when Baguazhang is done properly the opponent only hits air or they’ll hit your hard parts that you’re giving them while you’re getting out of the way.

Which means if they hit my elbow, if I’m there I still receive their force in, If I’m moving out of there I feel nothing. they catch my elbow in a place where for me it’s barely a touch but for him it’s BLAM, I just found his elbow! And they’re doing that with a fist or whatever they’re doing it with and it’s incidental to you, you just keep moving. In the middle of a real situation you will probably won’t know it happened.

Let them hit their friends

They’ll hit your hard parts or, they throw their hit at me and they hit their friend, and I help them hit their friend which you will get to in the more advanced programs, but initially he’s hitting his friend over there (in the direction of his punch) while you’re moving out.

So they hit only air, your hard parts (which could be more that just your elbow) or they’re hitting their friends. That’ll work for me just fine.

Baguazhang is Always Powerful

Let me add this last though for you for this part of it.

Baguazhang is powerful, whole body power hits to the opponent’s weak points or position while you’re moving, slipping and evading their attacks.

Just as Baguazhang always flanks and evades (or it’s not really Bagua) Bagua is always powerful or it’s not really Bagua either. thank You.